Örbital Audio

Dub Sequencer

A step sequencer for anything you run through it. Every step gets its own filter, volume, pan and envelope, so a held chord turns into a rhythm, a drum loop gets chopped and filtered, and a bassline starts to breathe. This manual walks through the panel from left to right, top to bottom.
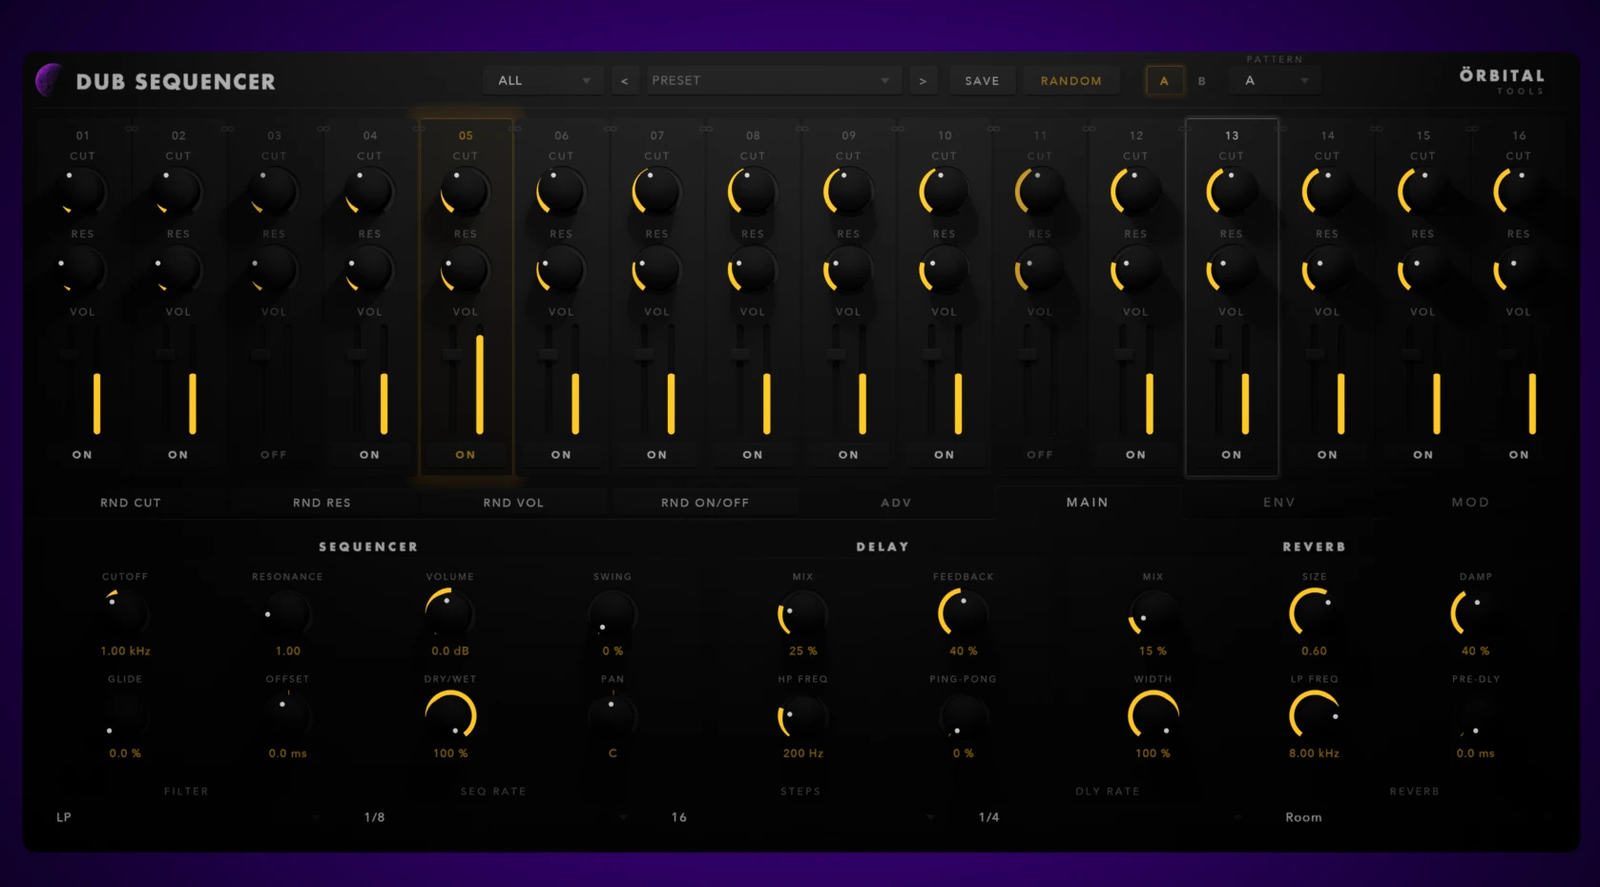
Dub Sequencer

Getting Started

Dub Sequencer is an effect, not an instrument. Put it on anything: pads, chords, drums, top loops, bass, synths, a whole bus. Each kind of source gives you something different, so it is worth being playful about what you feed it.

Install
Run the installer and pick the formats you need. On macOS the VST3 goes to /Library/Audio/Plug-Ins/VST3 and the Audio Unit to /Library/Audio/Plug-Ins/Components. On Windows the VST3 goes to C:\Program Files\Common Files\VST3. Restart your DAW afterwards, or make it rescan.
Activate or try
The first time you open it, choose Activate and enter your email address and licence key — you will find both in the order confirmation and in your account — or choose Start 30-day trial and enter the email address of your free Örbital account. A licence stays activated for a month and then checks in again quietly in the background.
First sound
Load Cold Morning from the PADS column, put it on a held chord, and press play in your DAW. The sequencer runs on your DAW’s transport, so nothing moves until the transport does. Then try the same preset on a drum loop and hear how differently it lands.

A sustained sound is the easiest place to hear what the sequencer does, because the pattern is the only rhythm there. On material that already has a rhythm of its own — a break, a top loop, a bassline — you are working against what is there instead of writing on a blank page, and that is usually where the interesting results come from. Try a slower SEQ RATE on those, so the sequencer cuts across the source instead of doubling it.

The Step Grid

Sixteen columns, each one a step. The sequencer walks through them in time with your DAW and applies whatever that column says.
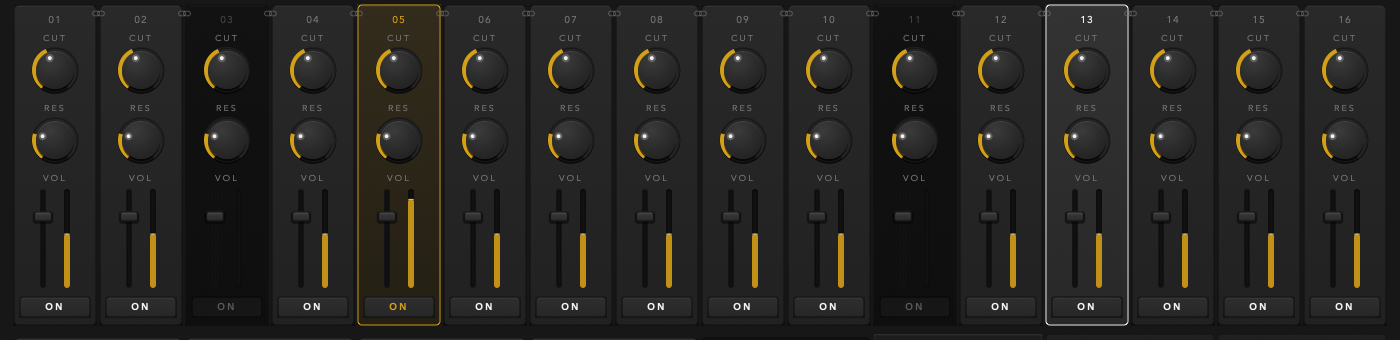
The step grid
Sixteen columns. Step 5 is playing, step 13 is selected, steps 3 and 11 are off. The links between the columns chain steps together.
CUT20 Hz – 18 kHz
The filter cutoff for this step. The filter type — low pass, band pass or high pass — is set once for the whole plugin in the FILTER selector at the bottom.
RES0.1 – 10
Resonance for this step. High values right around the cutoff give the whistle that dub relies on.
VOL
The level of this step. On a sustained sound this is what writes the rhythm; on a loop that already has one, it is how you take steps out and leave gaps.
ON / OFF
Silences the step completely. Turning steps off is usually a better way to build a pattern than pulling their volume down — it leaves room instead of leaving a quiet ghost.
Chain icons
The small links between two columns join them into one longer step. A chained block behaves as a single step: one set of controls, and its envelope stretches over the whole length. This is how you get a sweep that runs over four steps instead of restarting on each one.
STEPS8 or 16
How many steps of the bank actually play. At 8 the last eight columns are skipped; they keep their settings.
RND CUT · RND RES · RND VOL · RND ON/OFF
Randomise one row at a time, within musical limits. They only touch the bank you are looking at.

The bar beside each fader is a level meter, not a control. It shows what that step is putting out.

A/B Banks

There are two banks of sixteen steps. The A/B switch in the header chooses which one you are editing; the PATTERN selector next to it decides how they play.

Pattern

AAAAAABABABAABBAABBAAABAAABBAR 1BAR 2BAR 3BAR 4

Each block is one pass through a bank. With 16 steps at 1/16 that is one bar, so AABB repeats every four bars.

A / B
Switches which bank the grid shows. This only changes what you see and edit — the sequencer keeps playing whatever the pattern says.
PATTERNA · B · AB · AAB · AABB · AAAB · ABBB
The order the banks play in. A is the plain sixteen-step loop. AAAB is the classic: three bars the same, then one that breaks. Bank B is a good place for a fill, a drop, or the same figure with the filter opened up.
COPYTO B · TO A
Copies the bank you are looking at onto the other one: every step, its envelopes, pan, sends, chains and LFO assignments. Build the figure in A, copy it to B, then change B into the variation.

Steps are numbered 01 to 16 in both banks — the A/B switch tells you which one you are in. Chains never cross from bank A into bank B.

Envelopes

Every step has two envelopes: one on the volume and one on the filter. They are shaped in percentages of the step, so they keep their shape whatever tempo you play at.
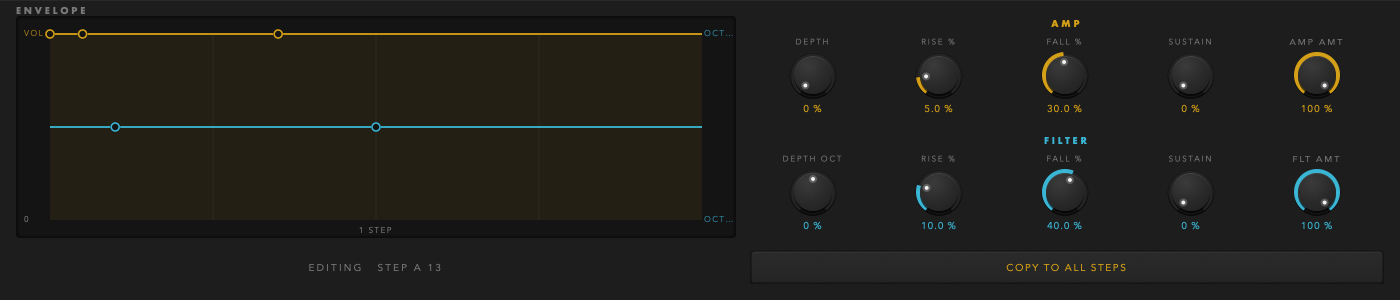
The ENV page
The graph on the left shows both envelopes of the selected step: gold for volume, blue for the filter. The knobs on the right set them.

Envelope shape

RISEFALLSUSTAIN

RISE climbs to the top, FALL drops to the SUSTAIN level, and SUSTAIN holds until the step ends. Drag a node in the graph to bend the segment into a curve.

DEPTH
How much of the envelope reaches the sound. At 0 the envelope does nothing; the step plays flat.
RISE %% of the step
How long the climb takes. Short is a click, long is a swell.
FALL %% of the step
How long it takes to drop from the top down to the sustain level.
SUSTAIN
Where it settles for the rest of the step. At 1 there is no fall at all; at 0 the step dies away completely before the next one.
DEPTH OCT−4 to +4 octaves
The filter envelope, in octaves rather than a percentage — so a sweep is musical rather than arbitrary. Negative closes the filter instead of opening it.
AMP AMT · FLT AMT
A single control over all sixteen steps at once. Useful for pulling back the whole effect without editing every step.
COPY TO ALL STEPS
Copies the envelope of the step you are editing to every other step, curves included.

The filter row is blue and the amp row is gold, matching the two curves in the graph. The step you are editing is named above the button — EDITING STEP A 13.

Modulation

Three LFOs and an envelope follower. Each one can drive any continuous control in the plugin — including the knobs and faders inside the step grid.
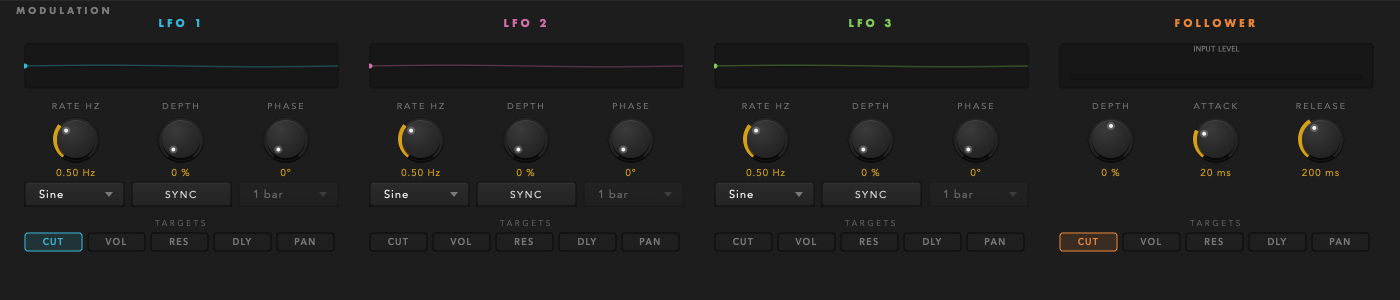
The MOD page
Three LFO strips and the envelope follower. Each strip has its own waveform window, rate, depth, phase, shape and targets.

How a modulated knob reads

ValueLFO rangeLFO now

Gold is where you set the knob. The coloured band is how far the LFO moves it; the dot is where the LFO is right now.

Assigning
Right-click any knob or fader and choose Assign to LFO 1, 2 or 3. A ring appears around the knob in that LFO’s colour. Right-click again to remove it, or use Remove modulation. The same menu has Reset to Default.
CUT · VOL · RES · DLY · PAN
The five buttons in each LFO strip are shortcuts to the five main destinations. They are the same setting as the right-click menu, so they stay in step with each other.
RATE HZ / SYNC / DIV
An LFO runs either free in hertz or locked to your DAW. Picking a division switches SYNC on; touching the rate knob switches it off. The one that is not in control is dimmed. Divisions run from an eighth note up to sixteen bars, so a sweep can take a whole section.
DEPTH
How far it swings. At 0 the ring shows a short stub so you can see it is connected but idle.
PHASE0–360°
Offsets one LFO against another so they do not all peak together.
SHAPE
Six waveforms:

Sine

Triangle

Saw Up

Saw Down

Square

S&H

Envelope Follower
The fourth source. Instead of an oscillator it follows the level coming in, so the plugin reacts to what you play. DEPTH is two-sided: to the right it opens its targets as the signal gets louder, to the left it closes them — that is ducking. ATTACK and RELEASE set how quickly it reacts; a release of 80–200 ms gives an audible pump.

The follower needs dynamics to work with, so this is where percussive material pays off: drums and top loops drive it hard. On a pad with a flat level it just sits at one value and holds the filter open, which is a fixed offset rather than movement.

Advanced View

ADV swaps the step columns for a second layer of per-step controls. The pattern keeps playing; only what you see changes.
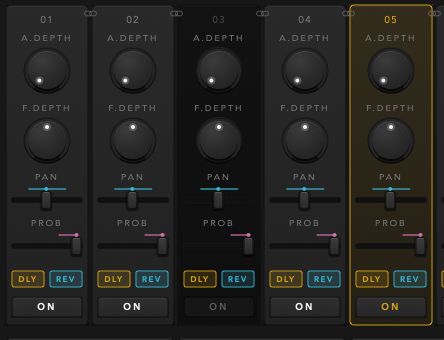
The ADV view of two steps
ADV swaps the columns for a second layer: envelope depths, pan, probability, and the delay and reverb sends per step.
A.DEPTH · F.DEPTH
The amp and filter envelope depth for this step, without leaving the grid. Handy for letting one step sweep while the rest stay flat.
PAN
Where this step sits in the stereo image. Alternating steps left and right gives width without a stereo effect.
PROB
The chance this step plays at all. Below 100% the pattern stops repeating exactly, which keeps a long loop alive.
DLY · REV
Whether this step feeds the delay and the reverb. This is the dub move: keep most of the pattern dry and send one step into the echo. Switching the delay off stops the step writing into the line — tails already there keep ringing out.

Delay & Reverb

Both sit after the sequencer, so they hear the pattern rather than the raw input.
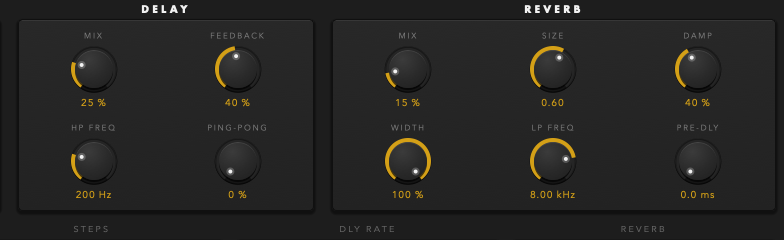
The delay and reverb sections
Delay and reverb on the MAIN page. The reverb type is chosen in the selector strip at the bottom of the plugin.
MIX · FEEDBACK
How much delay you hear and how long it keeps going. High feedback with the HP filter up is where dub lives.
HP FREQ
A high pass inside the feedback loop. Each repeat comes back thinner, so the echoes recede instead of piling up.
PING-PONG
Blends between both channels delaying on their own and the echo bouncing left to right. The rate stays the same either way; only the side alternates.
DLY RATE
The delay time, locked to your DAW from 1/32 up to a bar.
REVERBRoom · Plate · Hall · Spring · Chamber
The character of the reverb. Your knobs keep doing what they do; the type shifts the decay, damping, width and bandwidth around them. Plate is bright and dense, Spring is narrow and band-limited with the smear you would expect from a real spring, and Hall is the longest and darkest.
SIZE · DAMP · WIDTH · LP FREQ · PRE-DLY
The usual reverb controls. PRE-DLY keeps the front of the sound clear by delaying the tail; LP FREQ darkens it.

PING-PONG is a knob, not a modulation target. If you want movement across the stereo image, put an LFO on PAN instead — that is auto-pan.

Presets

A hundred factory presets in six categories, plus everything you save yourself.

CategoriesPADS · CHORDS · STABS · SWEEPS · DUB · GLITCH
On ALL the preset menu shows every category side by side, one column each, with your own presets and any preset packs in the columns after them. Pick a category to narrow the list to one. The arrows beside the preset name step through the list without opening it.
INIT
A clean starting point: flat pattern, no modulation, effects off.
SAVE
Saves the current state under a name of your choosing. Your presets land in a USER column after the factory categories and survive closing the plugin. Saving under a name you already used overwrites it — that is how you update a preset.
RANDOM
Breeds a new patch from two factory presets of the same category. The rhythm, the filter melody and the effects come from presets that already sound right; then the pattern is shifted, notes are added or dropped and everything is nudged a little. Right-click RANDOM to choose which category it breeds from, or leave it on any category.
Settings
Click the purple planet at the top left. Show presets in Finder (Explorer on Windows) opens your presets folder, Add preset pack… installs a pack, Rescan presets folder picks up files you copied in by hand, and the licence options sit underneath.
Preset packs
A pack is a .zip of .dubpreset files (on macOS a folder works too). It gets its own folder next to your presets and its own column in the menu. Any folder you make inside the presets folder works the same way, so you can sort your own presets into columns.

Your own presets live in ~/Library/Application Support/OrbitalAudio/DubSequencer/Presets on macOS and %APPDATA%\OrbitalAudio\DubSequencer\Presets on Windows. Back that folder up, or copy it to move your presets to another machine.

Licence & Devices

One licence covers three machines. You manage them yourself; nothing is locked to hardware you cannot reach.

First start
The first time you open Dub Sequencer it offers two choices: Activate with the email address and licence key from your account, or Start 30-day trial.
Trial
Start it from the trial page (orbitalaudiolabel.com/tools/dub-sequencer/trial): create a free Örbital account (or log in), download the plugin, then choose Start 30-day trial and enter the email address of that account. Every feature is yours for 30 days; the days left show next to the title. One trial per computer; when it ends the plugin goes silent until you activate a licence. Your sessions and presets stay exactly as they were.
Activating
Email address plus licence key. After that the plugin keeps a local licence that is valid for a month and renews itself quietly in the background.
Three devices
Studio machine, laptop, and one spare. If you reach the limit, deactivate a device from your account on the website and activate the new one. Selling or replacing a computer? Click the planet at the top left and choose Disconnect this device to free its seat right away.
Offline
You do not need to be online to work. The plugin only needs a connection for the monthly check; if it cannot reach us it keeps working and tries again later. A trial is the exception: it ends on its end date, online or not.
Licence menu
Click the planet at the top left for your licence status, Check license now, Disconnect this device, a link to your devices in your account, and Email support.

Something not working, or not covered here? Email support@orbitalaudiolabel.com and put this in the message:

  • the email address of your Örbital account;
  • which plugin, and which version;
  • your computer and which version of macOS or Windows it runs;
  • your DAW and its version;
  • what you were doing, and what happened instead.

That is everything we need to look it up, so it saves a round of questions.

Cart

Your cart is empty.